
Remember waaaaayyy back when I started sewing my very first slipcover?

I actually finished it—ta da!
I feel like someone should offer me a special prize, or at least serenade me with this song from my favorite musical, My Fair Lady.
I can’t explain why this project took me so long. I started it with lots of momentum, using only this picture as my guide.
From Pink's slipcover party at the Nester’s
Seriously, I’m notoriously independent when it comes to sewing. If I can go it alone, without a pattern to guide me, I will. “I’m a loner, Dotty, a rebel.”

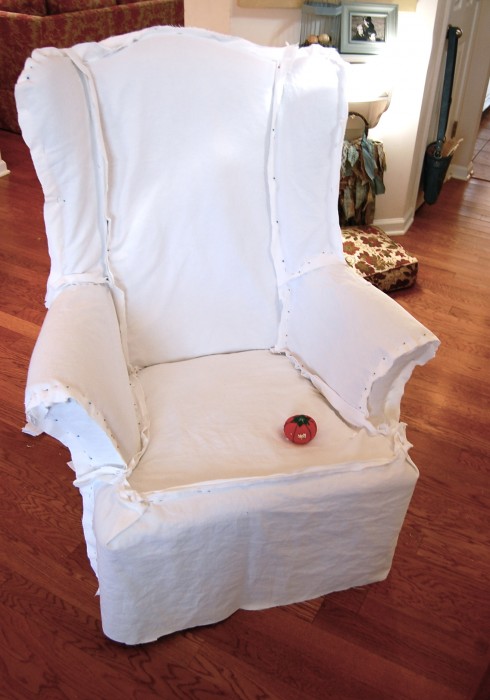
I started out with this classic wingback we adopted years ago (thank you, LeeAnn!), and a couple of canvas dropcloths purchase on sale at Home Depot. I actually have two of these babies, so the one on the left represents before, the one on the right is during.

It really wasn’t hard, just tricky. Again, don’t ask me to explain myself. All I can say is that dropcloths are a very cheap and forgiving medium.

After one day of intense labor, I got to this point and just ran out of steam. And then I forgot about it for the next six months or so….until an ice storm trapped me inside my house for three days. The ice storm commanded me to hand over my firstborn or sew.

I sewed.

I really hate to compare something that I worked so hard on to an unfortunate icon of the eighties, but really, how can I not?

It’s business in the front….

…..party in the back….I give you: the Mullet Chair!
This is why Pottery Barn will not be hiring me to write for them. Because I can’t think of a more sophisticated name for this chair. Oh well!

A couple of tips if you use dropcloths to make slipcovers….or if you make any kind of slipcovers:
- Buy more cloths/fabric than you think you will need
- Not all dropcloths are the same. There is a surprising amount of color variation from cloth to cloth. Make sure the ones you bring home are all the same.
- Wash and dry the cloths/fabric on warm settings before you start to cut and sew. This prevents shrinking later and makes them softer.
- Pink sells an e-book on slipcovering. It’s probably better to buy the book than to rely only on a picture of her slipcovering something. Right, Pink?
Join me tomoorw, when I’ll tell you how I was able to get wintry pillows and valances for a whopping $1.98!

Since spring is right around the corner, this week I’m showin’ off my winter décor. It's how I roll.

I’m linking this post to:
Your chair turned out great! I like it! Wish I could sew. It's on my bucket list. LOL!!
ReplyDeleteoh my! I love LOVE love this. did I mention how much I l*o*v*e this....
ReplyDeleteI have always wanted to do a drop cloth slipcover. I love your ruffle in the back as well. Makes it Fab!
Came over from Skip to My Lou. Love the slipcover!!
ReplyDeleteWhat a daunting task! But You did it! Yay!
ReplyDeleteHow about the "bustle" slipcover...much nicer than a"mullet"!
ReplyDeleteYou did a great job, now if I look at a few hundred more of these, I might actually get the courage to try one. Thanks for the tips!