Friday, January 29, 2010

Come on In!


Welcome!  If this is the first time you've stopped by my little piece of Holland, then I'm pleased to meet you.....and I should warn you that I don't actually live in Holland.  I live in the Midwestern USA.  So why do I keep making references to Holland in this blog?  Go ahead and click on the link underneath my header if you want to be in the know.

Now, let's get on to the good stuff.  I've gone through phases of my life where I just haven't had the brain space or time to energy to really enjoy homemaking.  Now is not one of those times.  It is such a remarkable experience, that I'm documenting it.  So, take a look at what I did yesterday.

This is the room you enter from my front door.
It is fun to have a fireplace in my front room, but it's a lot of pressure!  That mantle has to look gooood, since it can be seen from the front door.  So do the shelves.  I tend to think of the shelf tops as an extension of our mantle.
I love words, can you tell?  I use way more of them than I should in my writing, and my decorating.  Here we have three complete sentences on one fireplace!  I guess I'm a chatterbox, and so is my house.  These three phrases are particularly meaningful to me.
This one is our family motto:  "Choose the Right and Hold on Tight."  It's meaning?  We want everyone in our family to consistently choose right over wrong, and we want them to hold tight to the gospel of Jesus Christ and to each other.  When the children leave the house, I just say, "CTR!" and they know what it means.  

I custom designed the lettering (it's vinyl, not paint) through Uppercase Living.  The sign board is actually a maple cabinet door, which I discovered in the basement of this house after we moved in.  What a find!  Two maple cabinet doors....completely unattached to anything....just waiting for me to turn them into signs!  (I wonder, what were the previous owners planning to use them for?) This one sits on a plate holder and stays in front of our fireplace most of the year.
 
The quote above our fireplace is one that keeps my husband and I focused.  It was first said by Harold B. Lee, "The most important work we will ever do is within the walls of our home."

I can't remember where I found this saying, but the box reads, "Unshared joy is an unlit candle."  I love that one.  It is a great Christmas quote, but I like to keep it for my winter decor, too.  The box I made myself.  I'd seen some like it in magazines and online, and I decided that it wouldn't be too hard to make.  I had my husband show me how to use his chop-saw, then I just a 1x6 board for the base, cut 1x4 boards for the sides, nailed them all together, painted it with leftover paint from our Red Room, and roughed it up a bit.  The lettering, again, is vinyl.  I fill it with different things and move it around the house....it looks great as a centerpiece or on my kitchen island.  

Gee, I think I need to make some more boxes!

Here are some close ups of what I use for winter decorating in my box.


Most of these items were things I found around the house.  Except the pine cones.  You can't find pinecones like these in my neighborhood, so I splurged for a bag of cinnamon scented ones.   

This is the shelf to the left of the mantle.


Here, I incorporated the woodland theme from the joy box on the mantle, as well as some of the textures.  I also threw in some Valentine touches, like the rose petals on the snow.  The "cloche" you see is actually a cheese plate I found at my Goodwill.  

This is the shelf to the right of the mantle.
I devoted this shelf to Valentine's day, but added a touch of the woodland theme with a tiny red cardinal.
I love my apothecary jars!  I bragged/blogged about how I got my entire collection for less than $20 here, and provided a tutorial so you can do the same thing!

Well, it's time to go get my kindergartener.  Thanks again for stopping by!

Wednesday, January 27, 2010

Apothecary Jar & Cloche Tutorials

I'm going to show you how I acquired this collection of apothecary jars (AJs) for less than $20!

How to Make your Own Apothecary Jars
a tutorial

Disclaimer:  Someone, somewhere, has probably figured out how to do this already.  In fact, Martha Stewart is usually way ahead of me.  Mine may be the 80 millionth online tutorial for how to do this.  I, personally, have not come across any, so as far as I'm concerned, this idea is my own Mad Genius Moment.  


1.  As in most things, the first step of this tutorial is the hardest.....but trust me, you can handle it.  First, you need to shop your house or your local thrift shops.  You are looking for various sizes of lidded glass jars and crystal or glass candlesticks.  (If you aren't familiar with the look of an AJ, I suggest you do a quick online search.  Pottery Barn sells them, and you can find lots of other pictures online of how people are using them in their homes.  Or you can go back to here in this blog, and see some pictures and get links to other bloggers than have found fun ways to use AJs in their homes.  Or scroll down farther in this post.)  I was surprised at how many glass jars I was able to find at my local Goodwill, along with tons of candlestick holders.  You can either grab them randomly (as I did) and figure out how they work together once you get home, or you can really take a good look at the size and shape of each object and find perfect pairs while you are there at the shop.  It's totally up to you.  Here are the fruits of my randomness:
At Goodwill, I found my candlestick holders for $0.99/each, and my glass jars ranged in price from $0.99-$2.99.

I mentioned that you could shop your house, too.  You might be surprised at how many glass candy dishes you have tucked away in the recesses of your cupboards.  I was also able to find an inexpensive lidded dish on sale at Target, and a sweet candlestick holder that perfectly matched one of the jars at my local lumber store (it was only $1).

2.  Once you've acquired the separate pieces, you are ready to put them together.  Play with them to see which ones match up the best, using the candlestick holders as bases for the glass containers.  See how great these two are when paired up?
3.  Next, you need to clean up your finds.  The stickers from my local thrift shop were not easily removed, and some of my items had slashes of permanent black marker across them.  In this project, these will be key:
If you haven't met already, let me introduce you to Goo Gone.  It is good stuff.  Goo Gone and a little old-fashioned elbow grease removed the stickers, sticky residue from stickers and tape, and permanent marker that were junking up my pretty glass objects.  (Just use a rag with a spot of Goo Gone on it, and rub it over the gunk you want to remove.)  Goo Gone does leave an oily residue, so make sure that you have glass cleaner on hand to clean up the glass with, afterwards.  Also note that this oily residue can make glass very slippery.  Be careful!

Make sure you remove all stickers from your future AJs.  Particularly from the bottoms of those glass jars.  Nothing will ruin the look of your new AJ more than that sticker you forgot to remove that is now permanently stuck in between the two pieces of glass.

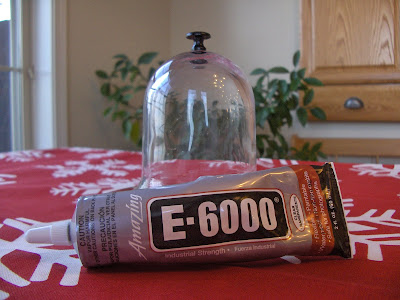
4.  Once the glass was all sparkly, I pulled out some more good stuff.  E-6000.  This stuff will be your new best friend by the time you finish this project.  I picked up this tube at my local lumber store for about $2.50.
Before I started this project, I did a quick online search to find out what the best thing was for gluing two pieces of glass together.  I decided this was the stuff.  E-6000 is typically used in jewelry making.  It takes 10-15 minutes to bond--giving you some time to work with placement--and dries clear.  DON'T use superglue, because it tends to dry brittle, which isn't good for a project like this.

My husband, the Bionic Man, who is incredibly knowledgeable about these things, suggested I use silicon caulk, which he had out in the garage.  I thought it might be a little difficult to control the caulk gun for the small areas I would be gluing, so I opted to spring for the E-6000.  If you have some silicone caulk you want to use up, go for it.

5.  As part of my research, I found out the E-6000 would adhere best if the surfaces I glued together weren't both as smooth as glass.  So I grabbed a piece of sandpaper
and lightly sanded the top of each candlestick holder
until that surface was scratched up a bit.  Do this over a garbage can because, after all, this is glass, and you don't want glass dust getting all over.  (Don't worry, there shouldn't actually be much dust from this.)
6.  Then, you take your tube of E-6000 and apply it to the surface of the candlestick holder on which the glass jar will rest.
7.  The final step is placing the glass jar on top of the candlestick holder.  As I mentioned, the E-6000 doesn't bond instantly, and dries clear, so you have some room and time for error.  I made some adjustments to the placement of of each of my jars before I let them rest and continue bonding.  E-6000 should be fully cured in 24 hours, don't lift your new AJs without holding onto both the jar and the base before then.  I went ahead and filled mine before 24 hours were up, assuming that the weight of the contents would help with the bonding process.  Sorry, I don't have any pictures of this step because my hands were busy with glass and glue.

Now, you can fill your AJs with something pretty!
I had a few things on hand at home (like marshmallows and seashells) that I started with.   A trip to my local wholesale floral/craft store found me some other inexpensive fillers:
fake rose petals (pictured above)
tumbled rocks
faux jewels
bird nests
marbles
Like the marshmallows I used, you can find lots of things at your grocery store that will work in your AJs, too.
fresh cranberries (I used these at Christmas, they lasted well over a month)
unwrapped candy
wrapped candy
citrus fruits
mini squash (great for fall)
Don't forget to shop your house!  The tiny figurine that sits on the pink rocks in one of my jars was just sitting, forgotten, on one of my shelves.  The ribbon and snowflake tied around my tallest jar are just leftover from Christmas (the snowflake is a tree ornament).

I should mention that I was able to find a $9 large AJ for 40% off at the wholesale floral/craft shop.  One of my glass jars came from there, too.  (Also 40% off.)  I totally lucked out on that large AJ.  It would have been hard to recreate that shape, and that particular shape worked really well with the rest of my collection.
Need more inspiration?  If you haven't seen my last post, go look at what The Nester does with AJs over at The Nesting Place.  (Look here and for lots of pretty peeks inside her AJs.)  Sarah on Clover Lane showed how her friend uses AJs here.  Come to think of it, I think it was this pic from Amorology that really got me obsessed about Ajs.
And I absolutely can't leave Pottery Barn out of the list.


See how much fun this can be?

I really have to give some blog love to Kami over at no biggie, whose Thrifty Thursday posts sent me running to Goodwill and made me think of repurposing thrifty finds.  Look what she did for Valentine's Day with her AJ:
See how smart Kami is?  This is how she avoided using many more conversation hearts than necessary.
Whew!  Have you seen enough apothecary jars for one day?  I hope you'll have fun making some of your own!  Let me show you quickly how I made a cloche in almost the same way.

How I Made a *Cloche
*I should mention that I saw something similar to this a few months ago on someone's blog.  Can't remember where.  So I can't take full credit for this one.  It was someone else's Mad Genius Moment.
1.  Found these random glass objects, each less than $1, and realized they would look great together.  I think the domed glass is from one of those hanging glass votive holders.  Very random.
2.  Woops, one of those random things was not less than $1.  It was actually $2.50.  That's the tiny dark speck you see.  It is a tiny drawer pull from my local lumber store.  How cute is that?  You'll need one of these--or something similar--to make a cloche.  I was originally looking for a glass knob, but my lumber store didn't have any that I loved.
3.  Run get that E-6000 out of the drawer again, and glue that little knob onto the top of the rounded glass thingy.  Set it on the base and--voila!--you've got a cloche.
Sadly, I have no pictures of this darling cloche with anything inside it, because I got so excited about sticking in the little red bird I found, I forgot that it takes 10-15 minutes for the E-6000 to bond, and....I had some glass to pick up.  That's right, I broke the darling cloche!  Considering my usual track record, one casualty amidst all this glass is not to bad.  But it had to be the cloche, didn't it?


Beyond The Picket Fence

Tuesday, January 26, 2010

Mad Genius Moment: Apothecary Jars

Apothecary Jars.
Have you heard?  They are all the rage.  I'm not sure who thought of using them lately, first.
(Is that a correct usage of lately and first?  The English major in me says no.)
That is to say, Apothecary Jars were obviously used in apothecaries first.
Someone reintroduced them to the vintage-crazed decorating world.  (Lately, first.)
I'm not sure who that first someone was, but Pottery Barn stole their idea,
splashed them here and there upon their hallowed pages,
and the rage began.

I didn't know about the rage, until I stumbled upon a blog called Nesting Place.  It is a beautiful blog, with such good ideas and tips for making a beautiful nest for your family.
The Nester showed off these one day, and I was hooked.

I loved them.  I had to have them.  Lots of them.  As many as the Nester.
But I didn't want to spend much money on them.
So I didn't order any from Pottery Barn.


This is what I do when I have one of those I-love-it-I-have-to-have-it moments.
I think, "How much do I have to spend on this type of thing?"
Then I go to Target.  If I can't find it at Target at that price, I just put that idea in a special file
inside my head.
Then if I ever see it for the price I'm willing to pay, I go for it.
Because good things come to those who wait.
(Sometimes good things come to those who jump up and do something about it themselves, too....but that part comes later.)

In early December, I was shopping at my favorite grocery store, Aldi.
You never know what you will find at Aldi.
I found my first apothecary jar.
For just the right price.
*$5.95
(*that's not an exact number.  I just remember that it wasn't more than $6.)


For Christmas, I filled it with shiny, red glass balls.  It looked lovely.
So lovely that I left it that way until yesterday.
Yesterday I filled it with something more suitable for the current season.
(Thanks for the inspiration, Sarah on Clover Lane!)
While I was getting the marshmallows at--where else?--Target, I went looking and found
one little, tiny apothecary jar.
Cute, and just the right price.  (Less than $5.)

It made me want more.  Lots, lots more.  I now possessed big and little, I needed sizes in between!

Ahem.  I interrupt this discourse to announce that, hereafter, I will refer to 
Apothecary Jars as AJs.
That's all, thank you.


So, while Endeavor was at ballet class yesterday, I visited the local thrift shop.
Goodwill.
Just saying the name makes me feel good.  Willingly good. And frugal.

Goodwill had no AJs.  None.
But they did have some cute glass jars with lids that I wished were AJs.
They also had glass candlestick holders.
A Mad Genius Moment!  Right there!  In Goodwill!
I realized that if I could glue the glass candlestick holders to the lidded glass jars,
I could make my own APOTHECARY JARS!!!


I don't experience many Moments of Mad Genius, so when I do, it's like Tom Hanks building his first fire on the Castaway Island.  I got crazy excited, right there in the housewares section of Goodwill.
So, I brought these lovelies home.  (Along with some others, not pictured.)

As of tonight, I have an Apothecary Jar collection.
I'm a collector, now!  Of something other than medical bills and dust bunnies!


Click here to go to my AJ tutorial.

Monday, January 25, 2010

Superkid's Version: Away in a Manger


We still have some of our Nativity sets on display.  I collect Nativity sets.  I like to display them for as long as possible.  The Bionic Man likes to display our Christmas Tree for as long as possible.  It, too, is still on display.  What can I say.....we are very festive.

But back to the Nativity sets.  This is one of my favorites, a tiny Nativity that was given to us by my brother-in-law and his brother, after they visited us while we were living in Germany.  They bought it in Oberammergau, the home of the famous Passion Play.
But wait, what's this?  There is something a little strange about this Nativity.
Who has joined Mary and Joseph at the Manger?  Let's zoom in and take a closer look.
Hmmm.....that looks an awful lot like a Polly Pocket I know.  That's strange, I'm pretty sure Polly Pocket is not from Bethlehem.  Or Oberammergau.
This looks like the work of Superkid.

"Whosoever therefore shall humble himself as this little child, the same is greatest in the kingdom of heaven."
- Matthew 18:4

Wednesday, January 20, 2010

Holland Gets Organized

Daunting title for a blog post, eh?


It takes us back to mid-December, when I blogged about "reflecting upon how I can better care for my body in the future."  Hmmm?  (If you don't remember, I'm not offended.....you can read it here--just keep in mind I was taking painkillers at the time.  Thank you.)


So, I reflected.  I had several epiphanies.  I schemed.  I took action.  And I am currently basking in the fruits of my labors.


Let me break down that process.    


I reflected.  Why is it that when I have a child on a high fat diet, I'm the one who gains weight?  Why was it so much easier to lose weight after my first two babies than after my last two?  What do I want from my body?


I had several epiphanies.   Stress.  Stress.  Usually the answer is stress.  But I've been using stress as an answer--or an excuse--for way too long, now.  And even though I don't buy much junk--really, I don't--I haven't been consistent about having lots of lean, fresh, high-quality meal choices for me on hand, either.  What I want from my body is strength, health, energy, and the opportunity to feel like I am striving to be the best person I can be, inside and out.


I schemed.  I read several informative books with new ideas.   I looked around my kitchen and pantry and thought about what worked and what didn't.  I made goals.  


I took action.  I found a group of friends that had similar goals, and we agreed to encourage and help each other along the way.  (We've challenged each other to the Game On! Diet.)  I worked hard to put together a plan to meet the dietary needs of every member of the family in a way that was manageable and realistic.  I spent some time creating tools to help me stay organized and on top of things.  I cleaned out and organized my refrigerators, freezers, and pantries.  That's right, all of those are plural.  The reason for that is another blog post in and of iteself.  


And I'm currently basking in the fruits of my labors.


Want to see?


I realized that if I was going to accomplish my goals, I needed to plan our meals carefully.  Admittedly, at least once a year, I try to follow a menu.  I've known for years that this is the way to do things.....I just have a hard time following through with my own plans.    Having a menu was the way my mom stuck to her grocery budget for HER ENTIRE MARRIAGE.  My mom is super, super organized and lives for routine.  (Hmm....maybe the reason why I am super, super unorganized and live for spontaneity.  Funny how that works.)


So I made a special binder.  Binders help me feel like I'm in control.


I filled it with all kinds of handy tools.

I plan my menus for two weeks at a time.  This is partly because I do two big shopping trips a month.  Above is a sample of the menu for our family meals, below is a sample of how I plan my meals during the Game On! challenge.  I really do eat breakfast....I just hadn't finished the menu plan for this week when I took this picture.

I used my Mac's spreadsheet program to make most of the tools for my menu binder.  It took a little time, but now I have them saved and can print them out any time I need them.  Here are some of my other planning tools.
Clockwise, from top left: 
1. I have a section in my binder where I store recipes that are family favorites.  
2. I also have a place to keep master copies of my menu calendars, shopping lists, etc.  
3. One section of the binder has info on the the special diet guidelines I am currently following.  
4. Another handy tool is my pantry list, which helps me keep track of all the food items I store in my pantry, storage room, refrigerators, and freezers.


When I plan each two week set of meals, I look first at what is on my pantry list that I can use, then I plan my shopping list.  This is a picture of last week's list.  Would you believe I spent less than $70 on two weeks worth of grocery items for my family?  I'll have to spend a little more on fresh items (milk and salad vegetables) next week, but most of what I purchased this week will last into next week.  That's what happens when I have a list of all my stored foods available as I plan out the menu.


So, my diet is going great, because I have everything planned out and don't have to sit and think, "Hmm, what can I eat right now?  Oh, since I can't think of anything, I'll have eight of these cookies, since they are handy."

My family is enjoying their meals, as well.  I'm getting dinner on the table at the same time every night and I'm not copping out and serving canned soup, just because I'm on a diet and don't want to see them eat anything appetizing.  Frankly, planning out my own meals in advance has helped me come up with meals for myself that seem at least as appetizing as theirs.  Since my own diet includes one "off the diet day" and one "off the diet meal" per week, I can plan in advance which meals I can enjoy with the family, too.

Yesterday I did a lot of advance food prep (it was helpful that it was diet day off....that way I could take lots of tastes).  I baked bread.  Yummy!  The Bionic Man feels homemade bread makes him that much more bionic, so I'm not a complete novice.  But, since I'm reducing our sugar intake, I've realized I need to be much, much more consistent about the bread baking (my recipe uses whole wheat flour and is sweetened with honey: both diet friendly).


I wish you could smell this loaf.  The picture obviously doesn't do it justice.  My favorite bread recipe makes 5 loaves; I make 2 batches and freeze most of it.  My family can eat one of these loaves for breakfast.  As far as I'm concerned, that is a cheaper, healthier alternative to cold cereal, so they can have at it!

Then I made cookie dough.  Notice that it is ready for the freezer.  That way, I can bake the cookies as we need them (for packed lunches) and I'm not tempted by them calling my name plaintively from the cookie jar.


I know this picture looks completely unappetizing, but this dough makes the best chocolate chip cookies, ever.  Period.  You know what is most awesome about this recipe?  It's multi-grain!  I use whole wheat and oat flour in it.  (Add enough butter and sugar to something, and you'll never guess how high the fiber content is, I guess.)  Let me know if you want the recipe.

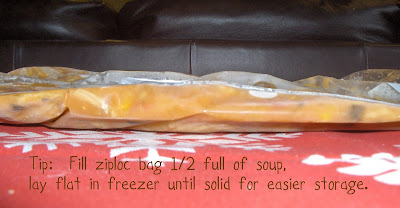
Amidst all the baking, I had time to fix this super-easy batch of soup from a recipe shared with me by my friend Heather, Homemaker Extraordinaire.  One batch served my family of five generously, with enough left over for two individual servings to be put in the Bionic Man's lunchbox, and another meal's worth of soup to go into the freezer.  This is how I freeze soup.


Again, this picture does not look appetizing.  Sorry.  I should have taken some pictures last night when we were actually eating it, not today after it had been frozen overnight.  Live and learn!  Trust me, this is really, really yummy and easy soup.

Heather's Chicken Tortilla Soup

2 cans chicken broth (or 2 cups water w/ 3 chicken boullion cubes)
2 cans cream of chicken soup
1-1/2 cups water
1 pkg. taco seasoning
Garlic salt (to taste)
Pepper (to taste)

Put into large soup pot and stir until smooth.  Add:

*1 to 1-1/2 cups salsa
1 can corn
2 Tbsp. dried cilantro or 1 bunch fresh, chopped
4-6 boneless skinless chicken breasts, chopped into bite-size pieces.

Stir all ingredients together on medium heat.  Heat through.

Serve with:

Tortilla chips, sour cream, guacamole, shredded cheese.

So delicious and family-friendly!

*Note:  when I made this last night, I used my favorite fresh Salsa from Sam's Club.  (Pictured below.)  I omitted the cilantro and 1/2 cup water, since this fresh salsa is pretty juicy and has cilantro in it.  This particular salsa is yummy, but too much for my family to use all at once.  I freeze 2/3 of it after purchasing, the frozen portion works perfectly in a recipe like this.


How are you doing with your goals for 2010?  Do you have any great ideas that will help me maintain mine and keep up the momentum?
I'm linking this post to:
Visit thecsiproject.com
And speaking of basking.....5 lbs. lost so far in 2010!