

Showing posts with label home decor. Show all posts
Showing posts with label home decor. Show all posts
Sunday, June 5, 2011
Girls' Bedroom Switcheroo


Monday, May 16, 2011
True Confessions: My Sewing Room
Remember when I told you I was redoing my sewing room?
{crickets chirping}
Really? You don't? That could possibly be because I made that declaration over a year ago. Oh dear.
I told you all of my good intentions for that room here. I even provided an oh-so-charming "inspiration board" for the so-called Aqua Poppy Sewing Room.
 Then I set about giving the room a complete overhaul. I mean, really, it needed it. Remember? Piles of stuff everywhere?
{more crickets chirping, owl hooting}
Oh, you don't remember that? Well, let me provide you with a link to my before shots of the sewing room...
{crickets chirping}
Really? You don't? That could possibly be because I made that declaration over a year ago. Oh dear.
I told you all of my good intentions for that room here. I even provided an oh-so-charming "inspiration board" for the so-called Aqua Poppy Sewing Room.
{more crickets chirping, owl hooting}
Oh, you don't remember that? Well, let me provide you with a link to my before shots of the sewing room...
Wednesday, March 23, 2011
Weathered Wood & Wire Picture Holder
I've been in a bit of a funk lately, have you noticed? I'm suffering from a severe case of writer's block, crafter's block, DIYer's block, and housekeeper's block. It's been terrible. You are welcome to bring casseroles.
Anywho, I was wracking my poor brain for inspiration and thought to look back in my blogging files for unpublished stuff.....and, looky here! I found somethin'.

Anywho, I was wracking my poor brain for inspiration and thought to look back in my blogging files for unpublished stuff.....and, looky here! I found somethin'.

Friday, March 4, 2011
I Shopped the House
Who coined that phrase? I use it all the time now, and the Bionic Man looks at me like I am cuh-ray-zay. Crazy like a fox! I’m not spending any money when I shop the house.

Thursday, March 3, 2011
Ribbon Trimmed Canvas Curtains
Earlier this week, I showed you how I made several things to insert bright colors and a fun pattern into my otherwise neutral décor.
Remember how that valance was originally a tablecloth? It was a pretty big tablecloth, but after two pillows and a long valance, I was starting to run low on snowflake fabric.
Originally, I planned to make another snowflake valance to top the window in my dining room (the other end of our large great room). I played around with a couple of ideas, but finally came up with something completely different.
Tuesday, March 1, 2011
Canvas Pillow Cover
I’m showing off some of my winter projects, this week. Yesterday was all about my cheery snowflake tablecloth that found a few new things to cover. Did you notice the pillow that was being propped up by some of those snowflakes?


This lovely canvas number was another one of my snow day sewing projects. I’ll be forever grateful to this pretty pillow for helping me figure out how my sewing machine works.

I started this pillow cover with one thing in mind: ruffles. I wanted something ruffly on this pillow, but I didn’t want it to scream, “I’M A RUFFLED PILLOW!”
It Snowed Inside
I know that today is the first day of March, and I should probably be thinking of spring….but we’re still experiencing winter where I live. Just humor me, this week, while I finally post some of my winter projects.


Here’s another snowflake pillow on the couch… ….with more snowflakes over the window!

Yesterday, this little pillow was in all the pictures of my newly slipcovered chair. See if you can find a couple of its relatives on the other side of my family room:

Here’s another snowflake pillow on the couch…


Believe it or not, it cost me all of $1.98 to make both pillows and the valance. What’s my secret to scoring such a great deal on fabric? I didn’t buy it at a fabric store.
All that fabric came from a tablecloth I found last year during Target’s post Christmas clearance.
Sunday, February 27, 2011
My Slip is Showing, the Sequel
Remember waaaaayyy back when I started sewing my very first slipcover?

I actually finished it—ta da!
Thursday, January 27, 2011
Project Time, Part 2
You can read about Part 1 here.
This project has been a long time coming: a tile backsplash in our kitchen.
Bionic Man has plenty of tile installation experience. He tiled both the kitchen and the bathroom in our Connecticut Cottage. He had promised me a tiled backsplash at least two years ago, but I waffled.
This project has been a long time coming: a tile backsplash in our kitchen.
Bionic Man has plenty of tile installation experience. He tiled both the kitchen and the bathroom in our Connecticut Cottage. He had promised me a tiled backsplash at least two years ago, but I waffled.
Wednesday, January 26, 2011
Project Time, Part 1
At our house, we've been working on a few projects. (And by "we" I mean Bionic Man.) The one I'm showing you today is almost complete. So, I don't have an "after" shot for you, yet, but I do have a before and a during. The change is so nice that I couldn't wait.
Here's the before:
 What you need to look at is the funky shelf, up high above the dresser. We have a vaulted ceiling in this room, and I guess that shelf was the builder's idea of "architectural interest." Huh. It took me years to stick stuff up there. The thought of getting up on a ladder to dust.....{shudder}. Finally, Bionic Man promised me he'd do the dusting, and we threw a few things up there. But still, it's just kind of blah, and I never could quite figure out why.
Here's the before:

Wednesday, September 22, 2010
Getting Ready for Fall: the Mantel


Window: vintage, from our first home
White pumpkin: from Target four years ago
Barn star, twine balls, birch candle, candle holders, hedgehog: various stores, elements I always use
Wreath: Christmas Tree Shoppes 1-2 years ago?
Pumpkin in a Frame: cute card a friend gave me 7 years ago, I framed it!
Apothecary Jars and Cloche: read about them here
Jar and cloche fillers: the jars are full of beech nuts and acorns that I gathered while hiking
the "pumpkin" is a grapefruit that I tucked in there to fill in for a mini pumpkin while I was taking pics
Yes, I did say grapefruit. It's called staging.
I'm linking to the Nester's Fall Mantle Party.
Monday, September 20, 2010
Deal Time: Barstools
Remember how I showed you our new barstools?
 I think I said they had changed my life? I wasn't exagerrating. They have. I {heart} the way they look in our great room.
Well, if you'd like to have your life changed by barstools, too, these just went on sale at Target. According to Target's weekly ad, you can get these exact stools for $15 (24") or $20 (29"). That is such a great price! (I'd take my receipt in and have it adjusted, but I think I'm past the 14 day window.)
While these stools might not change your life, I can guarantee that they are a cinch to put together, and that they are stable and sturdy.

Well, if you'd like to have your life changed by barstools, too, these just went on sale at Target. According to Target's weekly ad, you can get these exact stools for $15 (24") or $20 (29"). That is such a great price! (I'd take my receipt in and have it adjusted, but I think I'm past the 14 day window.)
While these stools might not change your life, I can guarantee that they are a cinch to put together, and that they are stable and sturdy.
Wednesday, September 15, 2010
Slip it under the Table

This post is like opening my underwear drawer. Is there anyone else who has places in their house, like this, that just seem to collect stuff? Tell me I'm not alone.

Tell me that your children come home from school and dump their backpacks on the floor and run away, too.

Today's blog post is for the rest of us.
The ones that have stuff randomly dropped on every. surface. of. our. homes.

This led to a highly productive discussion between the Bionic Man and I. The discussion began with me demanding a whole-house remodel and ended up with us discovering some more reasonable solutions. One of which was the eventual installation of a closet in the vicinity of our front door. (Hence, the blue tape lines you see in the corner of the picture up there. We're trying it with tape, first.)

What about the backpacks and school papers? Ever ready to knock down a wall or two, I suggested that we move our laundry room upstairs and remodel the existing laundry room into a homework room. (Yes, I do appreciate the fact that I have the kind of floorplan that allows for that kind of thinking.) The Bionic Man suggested, alternately, buying desks for the children's bedrooms.
That helped me recognize that I didn't want the children upstairs in their rooms doing homework. They've been gone all day and I like to enjoy having them home after school. Their homework time is when I prepare dinner, so if they were upstairs doing homework, I'd have to choose between preparing dinner in a timely fashion or overseeing their homework. It also made me realize that the perfect homework spot was our EXTREMELY UNDERUTILIZED kitchen bar.....the household magnet for everything that no one knows what to do with. We've never put barstools there because of the carpet on the other side of the bar; we thought we were being smart and saving the carpet.
Newsflash: barstools cost way less than remodeling!
We found these barstools at our local Target. I had originally picked out something much different on Target.com. Fortunately, my first choice was backordered--these actually fit the space sooooo much better than the others would have and cost $50 less. The brown leather seats match the sofas in the adjoining room, and the oil rubbed bronze legs match all the hardware and lighting in our house.
I love them as much as my electric griddle. They've changed my life.
So, how did I solve the problem of what to do with the backpacks? That was trickier. The closet won't materialize until the Bionic Man's time off over the holidays. I've always wanted to have a small table behind one of our couches, so I decided to find something that could do double duty as backpack storage and cute-table-behind-the-couch. Pottery Barn has this, but I don't have $700 lying around. Then I realized I had something already that would work.


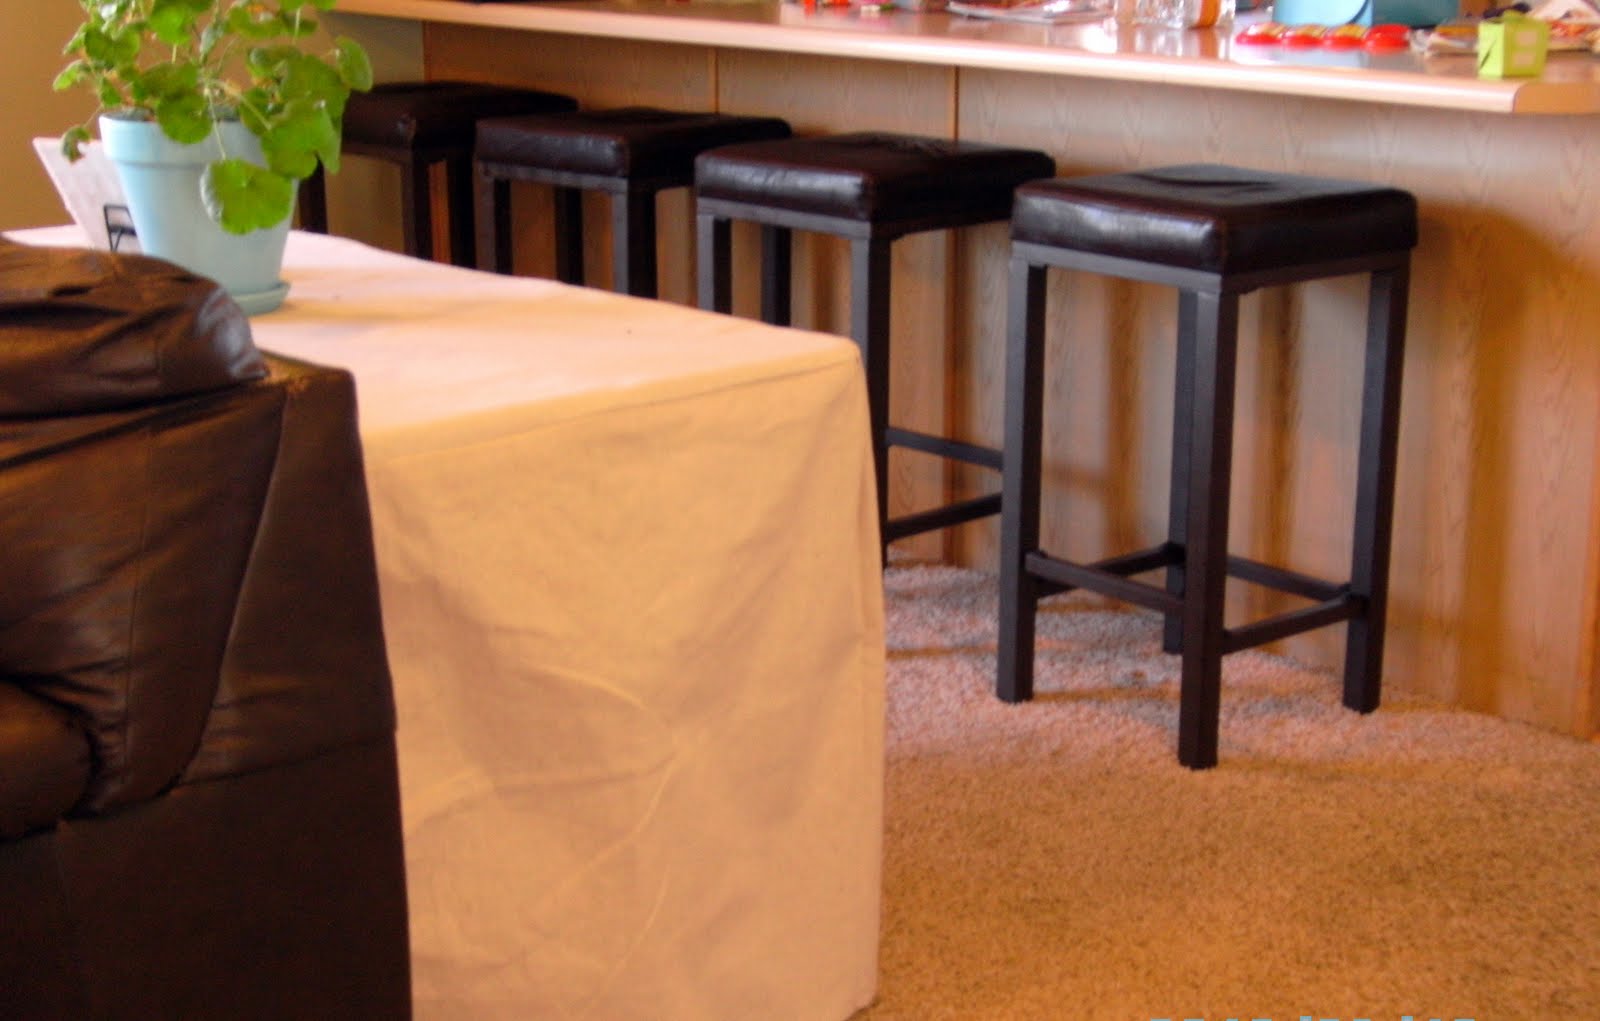

There was nothing complex in the making of this table cover. I turned the table over on top of a canvas dropcloth and traced the tabletop. I cut it out. Then I measured the perimeter, and cut out more canvas in the length I needed. I measured the distance from the top of my table to the floor and added 1/2 an inch. I made sure that the cut of canvas I used was already hemmed (dropcloths come pre-hemmed on all sides) so that I didn't even have to bother with that. Then I matched the pieces up and sewed a single seam. I had to allow for some slight gathering at the corners.

I layered the middle strip of fabric with the other two pieces, allowing for easy access underneath the table. It kind of gives the tablecloth a pleated effect. Note that I do not believe in ironing.


That's one thing checked off my list to make our home more organized. Is there anything you are doing to make life at your home easier?
Has this worked for me? Click here for the follow up.....


My Slip is Showing!
Got your attention, didn't I?
I now present....the slipcover project!
 There is a corner of my family room that needs a chair. Not wants a chair, needs a chair. Otherwise, it is just a strangely empty corner that throws the balance of the whole room. Because I'm too cheap to actually spend money on furniture if I don't have to, I've had a wing chair from our front parlor filling the hole.
It's part of a set: two wingbacks and a sofa. They are the best furniture purchase we never made. We got them for free from friends in Connecticut who were ready to set them out on the curb. Would I have made that fabric selection if I'd purchased them? No, but I am not one to say no to free furniture that looks like it has never been sat upon. Does that complicated floral pattern match my family room? No, but I needed a chair and that one had to do.
Finally, one day, after searching online for inspiration, I said aloud, "I CAN MAKE A SLIPCOVER FOR THAT."
And then I nearly passed out from the effort of just saying I could make it. After reviving myself, I decided that attempting to make a slipcover would be waaaaay more fun than helping the Bionic Man clean out the garage. Besides, I had plenty of cheap canvas from dropcloths that I could use, without feeling too badly if I messed up and wasted a bunch of fabric.
So, I just kept referring to this picture from the Nester, and reading her blog post about slipcovering throughout the day for encouragement.
 By Saturday night, I'd used every pin in the house, nearly said some bad words, had pricked my fingers mercilessly, and had talked my 11 year old into making dinner. But I'd also made a slipcover!
It really was easier than that description makes it sound, just nerve-wracking for a novice like me. I laid my oh-so-forgiving canvas over the chair, cut pieces out to "match" the various shapes of the chair, pinned those shapes together on the chair, basted the shapes together just in case the pins fell out, then took the pinned-together cover off the chair and sewed all the seams. The beauty of the canvas is that there is no wrong or right side, so I could just flip the sewed pieces right-side-out, and throw it on the chair.
The Bionic Man was very impressed.
 As you can see, it's not quite done. I haven't covered the seat cushion, yet. I ran out of canvas.
 I need to decide on the length for these curtains in my dining room, so I can cut off the excess and use it to cover the cushion.
 Also, I didn't finish sewing up a couple of the seams before I tried it on the chair. I was worried that it might not fit.
 And, I'm definitely not done with the hemline. I'm thinking a ruffle would be just the thing, there. But hey, I've made enough progress now to know that I can do the rest. I feel like such a smarty pants!
In fact, I'm pretty confident that I could make a slipcover for the other chair and it's matching couch, which live in our front parlor.
 What do you think? Should I do it? The whole project has me thinking of creamy white board and batten and chocolate brown walls for this room. Like in this room I found:
 Let me know if you are interested in getting more detailed instructions with pictures if/when I slipcover the other chairs. I didn't have a camera available while I was working, so I have no photographic proof that I actually did this. Or a means of showing you how, for this post.
Okay, so remember how I told you the waterproof camera died? Well, like Lazarus of old, it is back from the dead! Actually, unlike Lazarus, the camera was not actually dead. We had a package of defective batteries, apparently. While this means, unfortunately, that I still stuck taking photos with a dumb ol' waterproof camera, it also means that the Bionic Man has started shopping for the kind of camera I want. Probably because he's so impressed that I made a slipcover.
I now present....the slipcover project!

It's part of a set: two wingbacks and a sofa. They are the best furniture purchase we never made. We got them for free from friends in Connecticut who were ready to set them out on the curb. Would I have made that fabric selection if I'd purchased them? No, but I am not one to say no to free furniture that looks like it has never been sat upon. Does that complicated floral pattern match my family room? No, but I needed a chair and that one had to do.
Finally, one day, after searching online for inspiration, I said aloud, "I CAN MAKE A SLIPCOVER FOR THAT."
And then I nearly passed out from the effort of just saying I could make it. After reviving myself, I decided that attempting to make a slipcover would be waaaaay more fun than helping the Bionic Man clean out the garage. Besides, I had plenty of cheap canvas from dropcloths that I could use, without feeling too badly if I messed up and wasted a bunch of fabric.
So, I just kept referring to this picture from the Nester, and reading her blog post about slipcovering throughout the day for encouragement.

It really was easier than that description makes it sound, just nerve-wracking for a novice like me. I laid my oh-so-forgiving canvas over the chair, cut pieces out to "match" the various shapes of the chair, pinned those shapes together on the chair, basted the shapes together just in case the pins fell out, then took the pinned-together cover off the chair and sewed all the seams. The beauty of the canvas is that there is no wrong or right side, so I could just flip the sewed pieces right-side-out, and throw it on the chair.
The Bionic Man was very impressed.


In fact, I'm pretty confident that I could make a slipcover for the other chair and it's matching couch, which live in our front parlor.


Okay, so remember how I told you the waterproof camera died? Well, like Lazarus of old, it is back from the dead! Actually, unlike Lazarus, the camera was not actually dead. We had a package of defective batteries, apparently. While this means, unfortunately, that I still stuck taking photos with a dumb ol' waterproof camera, it also means that the Bionic Man has started shopping for the kind of camera I want. Probably because he's so impressed that I made a slipcover.
Subscribe to:
Posts (Atom)