Tuesday, May 4, 2010

A Mother-Daughter Trip: Part 2

As I mentioned in Part 1, the Bionic Man gave Endeavor and I airplane tickets for a trip to Connecticut.  We were there this past weekend, and we had the most marvelous time!  It was pure joy to see so many of our dear, dear friends, and to participate in a very happy occasion.  It was also really special to have time with just Endeavor and I together.  I've always enjoyed her--after all, she's my daughter!--but it just seems like the older she gets, the more fun we have together.  Oh boy, did we have some good laughs on this trip!

At the end of Part 1, Endeavor had requested a hairstyle for the big event worthy of Pride and Prejudice.
Once we arrived in Connecticut, we stayed with our "almost relatives", the Younger Bingham Family.  (Practically a Pride and Prejudice name!  No wonder we love them so much!)  Endeavor's best friends and fellow flower girls, Rachel and Erin Bingham, agreed that Pride and Prejudice hair was in order for their duties.

We enjoyed a day of beauty, spending hours on hair and nails.  At least the girls' hair and nails.  Bethany (their mother) and I decided 15 minutes of preparation was sufficient for ourselves.  We didn't want to blind the crowd with our beauty--we're thoughtful, that way.  Oh boy, were those three girls pleased with the results!

Here is Erin:


And Rachel:


And Endeavor:


We didn't want the flower girls to upstage the bride, so we limited them to a maximum of two flowers in the hair.

The first event of a very eventful weekend was a dinner party at our other "almost relatives'" home, the Older Binghams.  There, we met the groom's family (oh, the Becketts were sooooo nice!) and ate Uncle Morris's delicious dutch oven potatoes, chicken, and banana cream pie.  I've missed those potatoes almost as much as I've missed Uncle Morris and Aunt Bonnie and all the other Binghams.

The Pride and Prejudice hair was for the second event, the pre-wedding reception, where Rachel, Erin, and Endeavor were flower girls.

The setting was gorgeous!
Would you believe that is the multi-purpose room of the church building?  There are basketball hoops in there somewhere, but you certainly couldn't see them.  The gorgeous decor was done by LeeAnn Sanville, another friend.  She had lots of help from other friends of the bride's family--they are such good people, there were so many who wanted to be involved!

The whole thing was just beautiful, my pictures just don't do it justice.
The mural on those panels was painted by this darling seventeen year old, another friend of the family.  (Sorry that I can't remember your name!)
I think she's got a "blossoming" career!  Isn't that amazing?

It was so fun to celebrate with the Binghams, the Becketts, and to catch up with other friends who I haven't seen in almost two years.


Here's the beautiful bride-to-be, Loralee, dancing with her father.


Even cleaning up was fun!


This is the first wedding I've ever been to where the wedding reception was held the evening before the wedding ceremony.  I was curious about what that would be like.  Guess what?  It was wonderful.  So wonderful that when Endeavor gets married someday, this is how we are going to do it!  I loved the fact that we could all enjoy the fun reception one day, and then completely focus on the sacredness of two people committing to one another for eternity the next.  It was so wonderful to just enjoy the ceremony without having to hurry off to the reception.


You just couldn't have picked a more beautiful day for a wedding.  

Loralee and D.J. chose to be married for time and eternity in the Boston Temple, of the Church of Jesus Christ of Latter-day Saints.  It is the closest temple to the Bingham's home in Connecticut.


Temple weddings are very special, and different from the traditional, church weddings that most people attend.  If you would like to learn why temples are so important to Mormons, you can go here.  Or you can watch this video.  (And while I was looking for that video, I found this one, it is hilarious!)

The wedding ceremony was so, so beautiful.  It was attended by family and close friends.  The children waited outside--these little girls loved running around the beautiful gardens in their pretty dresses!


After the ceremony, we all waited outside for the bride and groom to make their big exit.  It was fun to visit while we waited with anticipation.


We all cheered when the bride and groom joined us outside.  


It is such a big deal for a Mormon couple to be married in the temple.  They have to make lots of good choices long before that day, so that they'll be worthy to enjoy the special blessings of eternal marriage.  The requirements for entrance into a temple include a commitment to living the Lord's commandments, being faithful and active members of the Church of Jesus Christ of Latter-day Saints, abstaining from addictive substances such as coffee, cigarettes, and alcohol, and being chaste before marriage.  So, you can imagine the pride and joy that parents and friends and former youth leaders and teachers feel when two young people choose to marry in a temple.  

This was how the happy couple responded when someone in the cheering crowd yelled, "Speech!"


Could anything be more eloquent?

Loralee and D.J. are such a special couple.  We enjoyed meeting D.J. and his wonderful family, but I still can't believe sweet Loralee is old enough to be someone's wife!  They are going to be so happy together.


Thank you, Loralee, for setting such a good example for Endeavor!  She loved every moment of your wedding and the accompanying celebrations (as did I!).  We were so happy that we could share your special day.  We're so proud of you and D.J.!

Well, as you can see, our Mother-Daughter trip was a success!  Endeavor was thrilled to be a part of the big event, and we both loved spending time with  many people that have been an important part of our lives.  Thank you, everyone!  And thank-you, Bionic Man, for making sure that Endeavor and I received the perfect birthday gifts.

A Mother-Daughter Trip: Part 1

Even before we'd celebrated Christmas, Endeavor knew what she wanted for her April birthday.  She wanted to go on a trip to Connecticut (our former home) to visit her dear friends and attend a special event.  I couldn't think of a better gift for my own April birthday than the very same thing.....so the Bionic Man gave both of us airplane tickets to Hartford for our birthdays.


Before we left on our trip, I had to come up with a special dress for Endeavor to wear at the special event.  She had requested something yellow and lavender.  Do you think we could find anything in those colors anywhere?  No, not in Endeavor's size.  So we went to the fabric shop.  Do you think we could find any cute prints with lavender and yellow there?  Again, no.  I was forced to improvise.

It was scary.  This is the most complicated thing I've sewn in the past 12 years.....and it wasn't really all that complex: no zippers, buttons, pleats, or major details.  Still scary, though.  I really, really wanted Endeavor to be happy with it--my goal for this trip was lots of happy memories, and the dress was part of that.

I used this pattern.
Simplicity's Project Runway pattern actually turned out to be a lot of fun to use--and that says a lot, because normally I HATE sewing with patterns.  But this one was great.  It gave lots of different options for elements of the dress, and listed fabric yardages by element, not dress style, so you could really mix things up.  Here were some of the choices we had: 
Endeavor had a very particular idea in mind for what she wanted me to create.  She wanted the dress to be longer than pictured.  She wanted it to be lavender, yellow, and white.  We never did find a fabric we liked with those three colors, so this is what we chose, instead:


Buttery yellow cotton, with an overlay of embroidered organza (on sale for 60% off, thank goodness!).  And those little lavender flowers....were they part of that organza?  No!  I actually sewed those on BY HAND so that they would coordinate with the lavender sash my darling daughter requested.  I'm not kidding.  I did that in an airport while we waited for a plane.  I tell you, this dress for Endeavor was quite an endeavor.

Anyway, like I said, the pattern was pretty simple.  My big sister, Lynne', helped me a lot via telephone.  She has lots of great sewing experience gleaned from sewing formals for her two teenage daughters, and I couldn't have done this without her help.  Thank you, Lynne'!  One of the things Lynne' has taught me is that you can make a simple pattern into a formal gown just by choosing elegant fabric.  See?


Not the best pictures, but you get the idea.  

One of the tricky things about this dress was the sleeves.  I managed to do a number of things successfully that I'd never done before:  line the dress, put on the organza overlay, add the embroidered details.  Endeavor had requested that the sleeves be like this:
Lovely, but guess what?  The dress fit before I put the sleeves in, but it didn't fit after I put the sleeves in!!!!  I'm sure that if I were an experienced seamstress, I could tell you why.  But I'm not, so I can't.  Endeavor and I both cried.  With the sleeves in, the dress looked okay, but poor Endeavor couldn't raise her arms or bend over!  It was just too tight.  With less than 24 hours before we needed to be on a plane, I was at a loss.  I didn't have time to make a new bodice in a larger size, which was what seemed like the obvious solution.  A friend suggested that I unpick the sleeves and just have Endeavor wear a light sweater.

But Endeavor had already named this her Pride and Prejudice dress.  (I recently introduced her to the Kiera Knightly movie version, and she's a big fan.  Yay!)  The first time she tried it on, Endeavor had exclaimed, "I look like I'm going to a Pride and Prejudice ball!  This is like something Elizabeth would wear!" 


 Did they wear sweaters over their dresses in Pride and Prejudice?  No, they did not.  Am I a sucker for anything to do with Jane Austen?  Yes, I am.  I had to do something!  So I prayed.  I prayed hard, and inspiration came.  Cap sleeves!  I am not kidding, I do not know how to invent sleeves that aren't on a pattern, so this was divine guidance at its finest.  The cap sleeves worked out just beautifully, and Endeavor couldn't have been more pleased.  I'm grateful that the original sleeves didn't work out, because let's admit it, the cap sleeves were just so much more Pride and Prejudice.

The little lavender trim worked out nicely, too.  Thank goodness for late nights and layovers!  Hand-stitching is just not my thing.  
The moral of this sewing story?  You can make even a very simple design look good if you find beautiful fabric and add a few delightful details.  

Of course, once the dress was complete, Endeavor had to ask, "Oh, do you think you can do my hair like Elizabeth's?"
Tune in for Part 2 of the Mother Daughter Trip, and you'll see how that turned out.  My goodness, I love my not-so-little girl!  And I do love a good Jane Austen inspired movie!  She knows just what to say to get me to pull out all the stops.


I'm linking this post to the following


Join us Saturdays at tatertotsandjello.com for the weekend wrap up party!

Monday, May 3, 2010

More Recycled Fashion

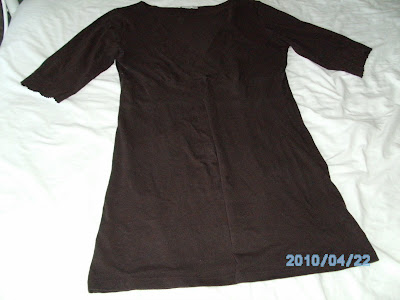
I think we all have a favorite item of clothing.  Mine is a brown shirt that I bought from my friend, Heidi, back in the days she sold Layers Clothing.  That brown shirt was very flattering.  Very forgiving.  So flattering and forgiving, in fact, that I was able to wear it through all the cold months of my last pregnancy.
It was nice and stretchy.  Wearing a shirt into the later months of pregnancy--especially a favorite shirt--has one big drawback.  It might stay stretched out.
So, what's a girl to do if her favorite {maternity} shirt is all stretched out?  Well, if she had some success recycling some of her daughter's clothes....
....she might start cutting up some of her own.
The steps I took to re-fashion Endeavor's shorts and shirts and my favorite/maternity shirt are very simple, and can be easily applied to most fashion recycling projects.

This is what you'll need for an easy re-fashioning project:

Gently used item of clothing
Sewing scissors (pinking shears are extremely helpful)
Sewing machine
Iron
coordinating fabric (small yardage--even scraps from other projects will do)
matching thread
measuring tape

After gathering your materials, you'll need to do a little planning: 

Consider the piece of clothing you'll be refashioning.  What is it about this piece of clothing that needs to be refashioned?  Is it too long?  Too short?  Is there a hole in it?  Stained?  Stretched?  Look at the item and think about how you can eliminate the problems during the refashion.

For instance, Endeavor's shirt had a stain on it, towards the hemline.  So, I cut off the shirt above the hem, cut up to the neckline, and trimmed the edges with fabric so it became a cropped cardigan.
With my old shirt, the problem was that the lower half of the shirt had stretched, leaving lots of unflattering wrinkles and a loose hemline when I tried to wear it.  The sleeves had also stretched over time.  In this case, a long cardigan seemed like the best solution.  Hence, the cutting, as pictured above.
Straight up from hemline to neckline, and then at the sleeves, just below the elbow.

Once you've planned what will work for your re-fashioned style, take a look at your fabric scraps and find some coordinating pieces.  You'll use these to trim the cut edges of your clothing item.

The next steps involve cutting and sewing.

For both of my projects, I did the same basic things.

I made my own trim by measuring the length and width of trim I wanted to have on my outfit.  I added 1 inch to the length, and I doubled the width and added 1 inch.  I used these measurements to cut out strips of fabric.
I folded over 1/2 inch of fabric on both sides of my strip, and ironed the folds in place.
I also folded in and ironed the ends.

Then, I folded this strip of fabric in half and ironed it.
This became the trim that I used for the neckline and front of my cardigan.  I did not cut my trim on the bias, so it isn't technically bias tape, although the concept is similar.  I have washed this cardigan, and didn't have any issues after washing with this type of trim, so I can vouch for non-bias trim on projects like this.

I'm a novice seamstress, and I did find that with the knit material I was sewing my trim onto, there was a little stretching as a sewed.  So, you may want to account for this by adding a little extra length to your trim.

Next, I laid out the part of the shirt I was trimming, with the cut edge lined up with the fold of the trim fabric.  I ran a strip of stitchwitchery tape down one side before I folded the fabric strip over it.  Then I ironed it down.  The no-sew tape helped hold the fabric in place--a little easier than pins when sewing a project like this.

I sewed the fabric strip onto my shirt.
I thought it looked better to have two seams running down this trim, so that's they way I did it.  I used thread that complemented my fabric, but didn't blend in, so that the seams became one of the details of my piece--similar to the double, contrasting seams on jeans.

It was getting late at this point, and I started running out of steam.  I don't have detailed pictures for making the sash.  Basically, I decided on a length and width.  I doubled the width and added 1 inch.  Once I had the sash pieces cut out, I folded them in half, with the outside of the fabric inside the fold.  I sewed a straight seam (1/2 inch) then ironed it flat, as pictured above.  I didn't sew the ends, because I needed to turn the sash inside out of what it was, so that the seam was inside.  Then I ironed it again, sewed the ends closed, and pinned it onto the shirt.
I stitched the sash onto the shirt with seams on both the upper and lower sides.  I continued these seams down the length of the sash, even though I wasn't sewing the ends onto anything--just for aesthetic reasons.

Sorry, I was totally pooped out by the time I got to the sleeves, so I don't have pictures of how I made those.  All I did was sew a ruffle onto a fabric band, and attach that to the raw edges of the sleeves.
And this is how it all turned out.
A fun spring cardigan to layer with other tops!  This same design could be applied to an old dress to make a longer cardigan or a swimsuit cover-up.

I'll be linking this post to


Join us Saturdays at tatertotsandjello.com for the weekend wrap up party!
   

 UndertheTableandDreaming